
Your cart is currently empty!

Warning:
- Before installing and using the product, please read the instruction manual carefully and keep it properly.
- Before using the electric pump, it must be reliably grounded, and a leakage protection device should be installed.
- Do not use water containing sediment or metal powder; the medium temperature must be below 95°C.
- During installation, a leakage protector must be installed and properly grounded.
- Strictly prohibit running the pump without water (dry operation).
- Fill with water before first use.
Application Scenario
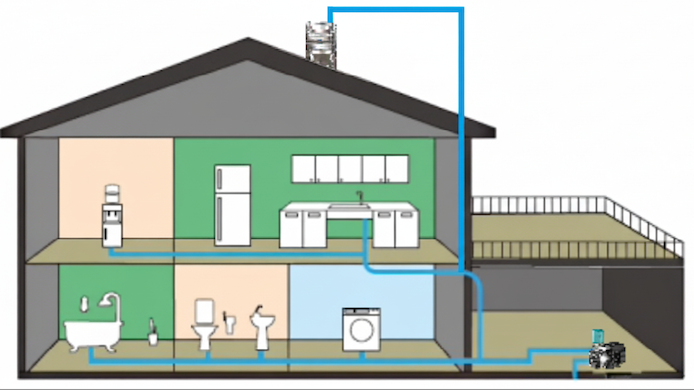
Suitable for various household water supply applications, such as villas, duplex apartments, and bungalows. It can be used to boost household tap water pressure, draw water from wells, or increase pressure for rooftop water tanks.
Conditions of Use
- Before first use, fill the pump chamber with water and make sure the pipeline has no leaks.
- This product has a built-in frequency converter and must not be used as a submersible pump. Do not place it in water to avoid damage.
- The product will only operate when the water pressure in the pipeline reaches a certain level. The solid impurities in the water must not exceed 0.19% by volume, and the particle size must not exceed 0.2 mm.
- Manual mode operates continuously without automatic shutdown. It must not run dry and should only be used in emergencies when faults occur; otherwise, machine damage may result. The temperature of the conveyed medium must not exceed 95 °C.
- Power supply frequency: 50/60 Hz; voltage: single-phase AC 220 V; voltage fluctuation range: 160–280 V.
Installation and Operation Instructions
- Do not run the pump dry without water or priming.
The pump body must be filled with water before switching on. - The pump must be placed in a horizontal position!
When connecting the water inlet, pay attention to the water flow direction. - After installation, ensure the piping is completely sealed.
Check adapters and valves for leaks. After stopping water use, close the valve to prevent loss of pressure that could cause the pump to keep running.
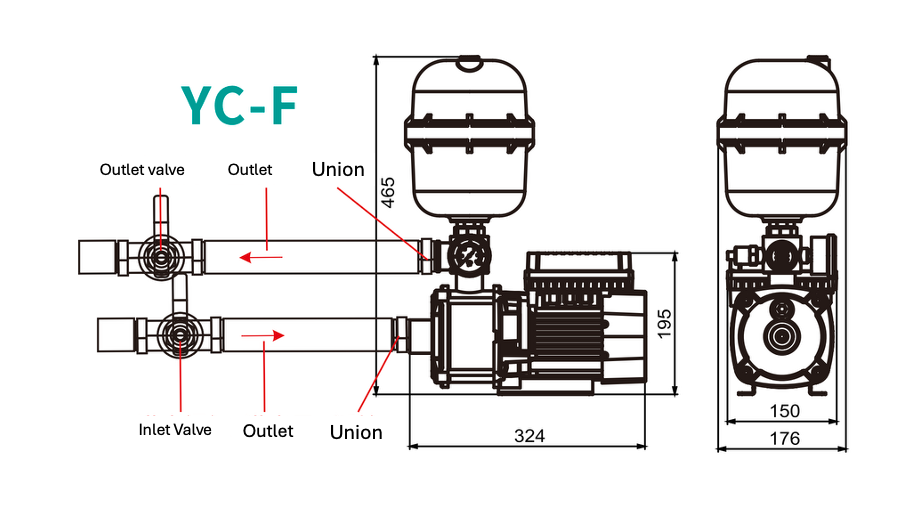
YC-F Operating Instructions
Restore to Factory Settings:
Press and hold all three buttons for five seconds to restore factory settings.

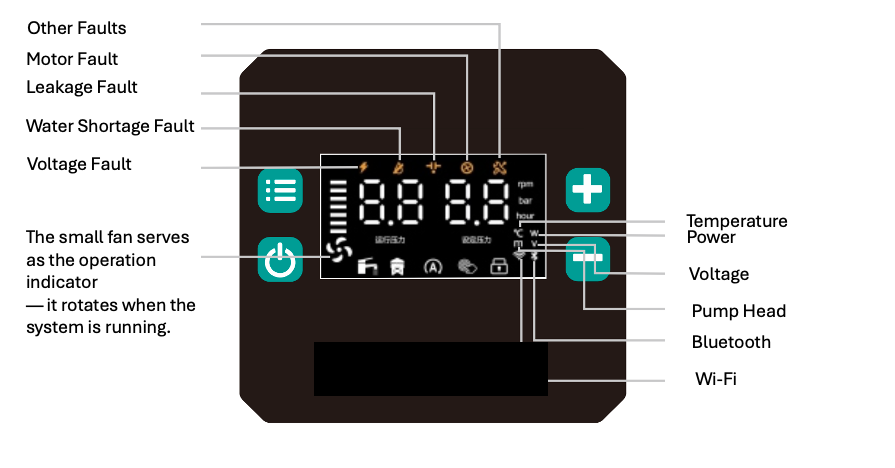
Emergency Start Mode
In this mode, manual start and stop are required.
Press and hold the “Power” button for 10 seconds to enter.
At this time, the indicator and “rmp” lights turn on.
The left digital display shows the operating speed, and the right display shows the set speed.
Use the “+” and “–” buttons to adjust the set speed.
Setting Mode
To enter the setting mode for the first time, press and hold the button for 3 seconds.
After entering, a short press on the same button will move to the next setting.
If there is no operation for 5 seconds, the system will automatically exit the setting interface.
A short press switches the display between water temperature, voltage, and other parameters.
Water Tower Mode 
Press and hold the “–” and “Power” buttons simultaneously for 3 seconds to enter.
At this time, the corresponding indicator ![]() , the “A” light
, the “A” light ![]() , and the “hour” light
, and the “hour” light ![]() turn on.
turn on.
When the pump is not running, the left display shows the remaining time, and the right display shows the set time.
When the pump is running, the left display shows the operating pressure, and the right display shows the set pressure.
Use the “+” and “–” buttons to adjust the set time.
Constant Pressure Mode
Press and hold the “+” and “Power” buttons simultaneously for 3 seconds to enter.
At this time, the corresponding indicator ![]() , the “A” light
, the “A” light ![]() , and the “bar” light turn on.
, and the “bar” light turn on.
The left display shows the operating pressure, and the right display shows the set pressure.
Use the “+” and “–” buttons to adjust the set pressure.
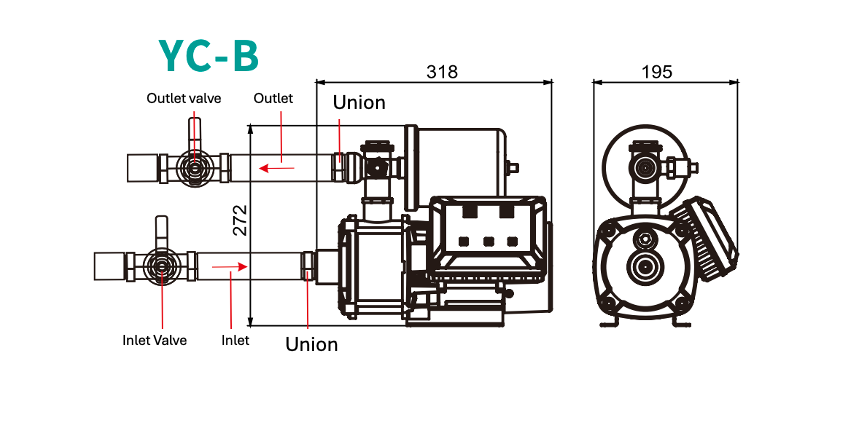
YC-B Operating Instructions
Restore to Factory Settings:
Press and hold all three buttons for five seconds to restore factory settings.
Operating Instructions
Power On/Off Button:
Controls the start and stop of the water pump. When a fault occurs, press this button to reset.
Increase Button (+):
In water tower mode, press to increase pressure or operation time.
Decrease Button (−):
In water tower mode, press to decrease pressure or operation time.
Press “+” and Power Button simultaneously:
Switch to Constant Pressure Mode.
Press “−” and Power Button simultaneously:
Switch to Water Tower Mode.
Long Press Power Button (3 seconds):
Enter Emergency Start Mode.
Press “+” and “−” simultaneously:
Enter Function Calibration Interface (see detailed explanation in function interface section).
Mode Description
Constant Pressure Mode:
This is the default mode. No settings or adjustments are required.
Once powered on, the system operates automatically.
If the water pressure does not meet usage demand, use the Increase (+) or Decrease (−) buttons to adjust the pressure.
Water Tower Mode:
When the water tower needs filling, switch to this mode to enable timed auto start.
The default initial runtime is 0.5 hours (30 minutes).
Press the Increase (+) button to extend the duration in 0.5-hour increments, up to 48 hours.
To reduce the runtime, press the Decrease (−) button.
Emergency Start Mode:
In emergency cases where the system cannot start normally, press and hold the power button to manually control motor speed.
The default target speed is 1000 rpm.
Press the Increase (+) button to raise the speed in 100 rpm increments, or the Decrease (−) button to reduce it.
If overheating, overload, or sensor failure occurs, the system will alarm.
Emergency mode should be used only temporarily and not for long-term operation.
Product Parameters:
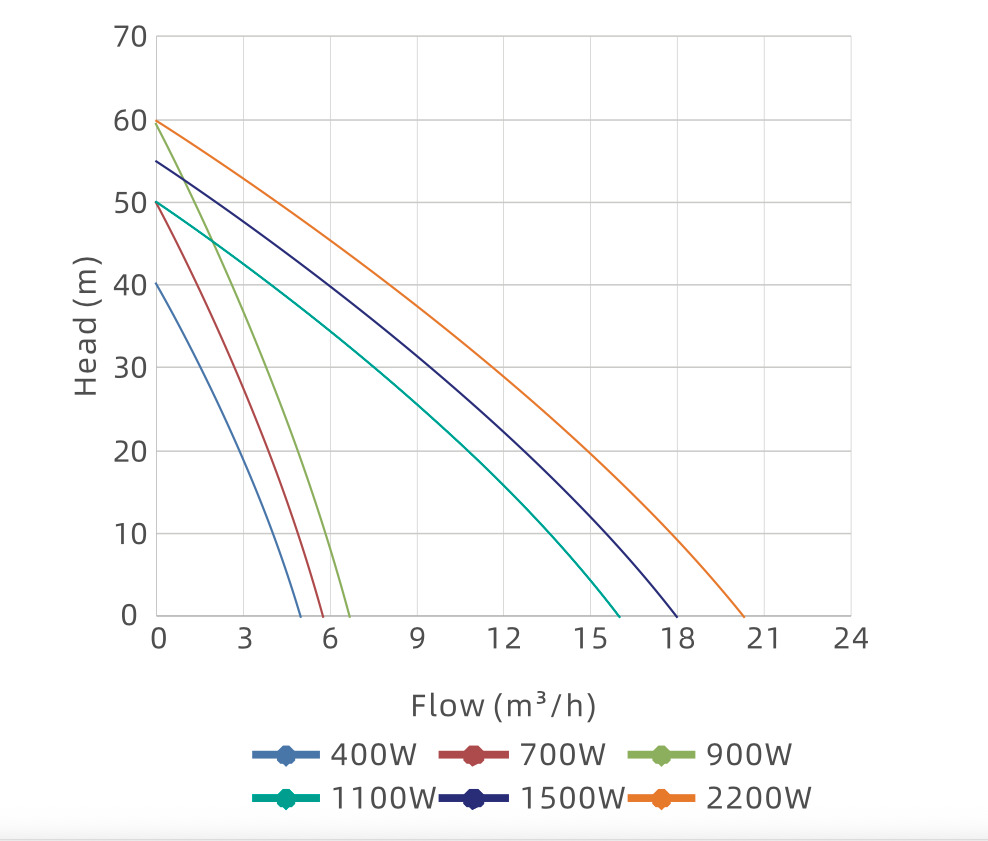
Performance Parameters
TECHNICAL DATA
| Model | Power (w) | Rated Flow (m³/h) | Rated Head (m) | Max Flow (m³/h) | Max Head (m) | Max Speed (r/min) | Inlet/Outlet (mm) |
|---|---|---|---|---|---|---|---|
| YC-B-400 | 400 | 2.5 | 22 | 4.8 | 40 | 4200 | 25 |
| YC-B-700 | 700 | 3.5 | 30 | 5.8 | 50 | 4600 | 25 |
| YC-B-900 | 900 | 4 | 30 | 6.5 | 60 | 4300 | 25 |
Setting Page Description
| Setting Code | Setting Description |
|---|---|
| C1 | Pressure calibration setting. Minimum value: 0, maximum value: 2.0, default initial value: 1.0. Used to calibrate the current pressure display value. |
| C2 | Low water pressure threshold setting. Minimum value: 0, maximum value: 1.0, default initial value: 0.5. When the actual water pressure remains below this threshold for an extended period (as set by the “Low Water Delay Time”), a low-water fault is reported. |
| C3 | Low water delay time setting. Minimum value: 1, maximum value: 5, default initial value: 3. Unit: minutes. |
| C4 | Pump start pressure ratio setting. Minimum value: 50, maximum value: 90, default initial value: 70. When the actual water pressure is lower than (set pressure × start pressure ratio), the pump will start. |
| C5 | Low water temperature alarm switch. 0 = Off, 1 = On. Default is Off. |
| C6 | High water temperature alarm threshold setting. Minimum value: 25, maximum value: 80, default initial value: 80. When the water temperature exceeds this threshold, a high temperature alarm is triggered. |
| C7 | Low water temperature alarm switch. 0 = Off, 1 = On. Default is On. |
| C8 | Pressure upper limit adjustment. Maximum value: 8.0. |
| C9 | Logical option for pressure deviation judgment. When value = 0, the deviation between the set and actual pressure is ignored. When value = 1, the CA setting value is used for judgment. |
| CA | Pressure deviation ratio. The higher the value, the slower and smoother the outlet pressure change, but the response time will be slower. Default value: 3, minimum value: 2, maximum value: 20. |
| F1–F4 | Motor parameters. Not adjustable by the user. |
Function Description
| Function | Notes |
|---|---|
| Low-Water Protection | When the pump fails to draw in water or the pressure remains below 0.5 (default) for more than 30 seconds (default), a “Low-Water” fault alarm will occur. The “Low-Water” indicator light will flash. When the water inlet or water supply resumes, press the reset/start button to clear the fault and restore normal operation. |
| Anti-Freeze Protection | When the internal water temperature of the pump is below 3°C and the pump has not operated for a while, the system enters anti-freeze protection mode. The motor will intermittently run for 5 minutes (or a user-set duration) to prevent freezing. During this process, the “Low-Water” indicator light will flash. |
Fault Troubleshooting Table
| Fault Code | Description | Solution |
|---|---|---|
| E01 | Low voltage | Check controller input voltage |
| E02 | High voltage | Check controller input voltage |
| E03 | Sensor fault | Check connection between controller and sensor |
| E04 | Module over-temperature | Check controller cooling |
| E05 | Software overflow | Contact after-sales service |
| E06 | Hardware overflow | Contact after-sales service |
| E07 | Current sampling offset error | Contact after-sales service |
| E08 | Start-up failure | Contact after-sales service |
| E09 | Phase-loss fault | Check motor connection wiring |
| E10 | Stall fault | Check whether there are foreign objects in the pump cavity |
| E11 | Communication fault 01 | Check connection between main board and panel |
| E12 | High-temperature alarm | Wait for water temperature to drop or raise threshold |
| E22 | Communication fault 02 | Check connection between main board and panel |
| E21 | Communication fault 03 | Check connection between main board and panel |
Solutions for Pump Not Starting or Not Stopping
| Fault | Cause | Diagnosis Method | Solution |
|---|---|---|---|
| Pump not starting | The water tower or water tank mode has not reached the set time, so the pump cannot start | Observe if the indicator light for tower/tank mode is on | Wait until the long-delay timer finishes, then switch to constant pressure mode |
| Pump not starting | Pump stop button pressed | Observe if the logo light is always on | Press the start/stop button once |
| Pump not starting | Pipeline already filled with water | Manually stop the pump and observe the actual pressure change. If the actual pressure is greater than the set start pressure ratio (default 70%) | Increase the set pressure. If even at maximum the actual pressure is still higher than the start pressure ratio (default 70%), go to setting C8 to lower the set pressure upper limit |
| Pump not starting | Low water level alarm or the water level has stayed below the value (default 0.5m) for more than 3 minutes | Check whether the water tank is empty | Confirm whether the inlet pipe has sucked in air. Check whether the sensor is dry. If the maximum detected water pressure is lower than 0.5, go to setting C2 to calibrate or adjust the water level probe |
| Pump not starting | Pump failure | Check if the failure indicator light is on, and whether the digital tube shows a fault code | Refer to the manual or video for fault code troubleshooting |
| Pump not stopping | Inlet pipe without a check valve | Close the outlet valve, press the start/stop button, and observe whether the pressure drops. If there is a drop, the check valve is installed; if not, it’s missing | Install a check valve at the water inlet |
| Pump not stopping | Set pressure too low | Close the outlet valve, and if the actual pressure is less than the set stop pressure ratio (default 70%) | Lower the stop pressure setting or increase the shutoff pressure |
| Pump not stopping | Pipeline leakage | Close the outlet valve, press the start/stop button, and observe whether the pressure slowly decreases | Check the pipeline and faucets for leaks |
| Pump not stopping | Pressure tank membrane damage or air loss | Use a screwdriver to press the valve core inside the pressure tank air nozzle. If air comes out steadily, the tank is fine. If water comes out, the membrane is damaged. If neither air nor water comes out, the tank is full of water. | Recharge the pressure tank with air or replace the damaged membrane (slowly inflate with a hand pump or inflator until water flows out properly) |
Leave a Reply