
Your cart is currently empty!

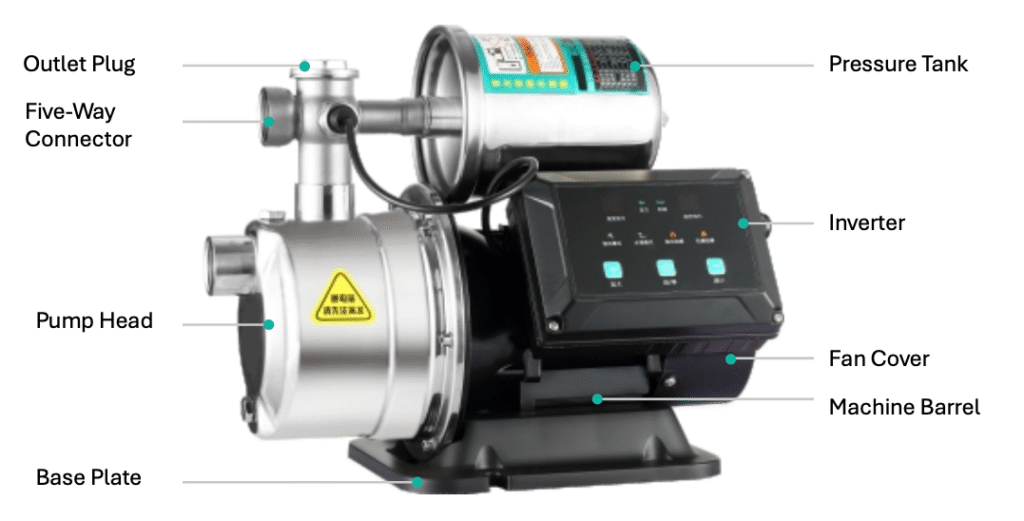
Product Overview
This manual contains the essential information required for the installation, operation, and maintenance of the pump. During installation, all relevant instructions in this manual must be strictly followed, and the work must be carried out by qualified professionals. If the pump is installed, operated, or maintained without following the instructions provided in this manual, the manufacturer assumes no responsibility. If the pump is transferred to a third party, this operation manual must be transferred together with it. If there is any information not covered in this manual, please contact us.
Special Notes:
- This product has a built-in inverter and must not be used as a submersible pump. Do not place it in water to avoid damage.
- This product will automatically start and operate only when the water flow in the pipe reaches a certain pressure.
- In manual mode, the pump operates continuously without stopping. It must not be used without water and is intended only for emergency use in case of malfunction; otherwise, it may cause damage to the machine.
Product Application Scenarios
Can be used for various household water supply applications, such as villas, duplex apartments, and large flats. Suitable for boosting household tap water pressure, drawing well water, or increasing pressure from rooftop water tanks.

Conditions of Use
- The temperature of the conveyed medium shall not exceed 50°C, and the pH value of the medium shall be between 6.5 and 8.5.
- The volume ratio of solid impurities in the water shall not exceed 0.1%, and the particle size shall not be larger than 0.2 mm.
- The power supply frequency shall be 50 Hz, with a single-phase AC voltage of 220 V, and the voltage fluctuation range shall be 160–280 V.
- Before initial use, the pump chamber must be filled with water to ensure that the inlet pipeline is free of leakage.
The intelligent permanent magnet variable frequency booster pump complies with the Q/SG206 standard. It is a new generation of variable-frequency constant-pressure water supply equipment, mainly composed of a controller, permanent magnet motor, and pressure tank. The pump adopts a centrifugal impeller and guide vane structure, featuring large water flow, stable operation, and low noise. It has an elegant appearance, compact structure, and convenient installation and operation. The system automatically adjusts the operating frequency according to user demand to maintain constant pressure in the pipeline network, ensuring more efficient and energy-saving operation.
Operating Instructions
- Start/Stop Key: Used to start and stop the pump. When a fault occurs, press this key to reset.
- Plus Key: Increases pressure or time (in water tower mode).
- Minus Key: Decreases pressure or time (in water tower mode).
- Press Plus and Start/Stop Keys simultaneously for 3 seconds: Switches to constant pressure mode.
- Press Minus and Start/Stop Keys simultaneously for 3 seconds: Switches to water tower mode.
- Press and hold Start/Stop Key for 8 seconds: Enters emergency start mode.
- Press Plus and Minus Keys simultaneously for 3 seconds: Enters the function calibration page (see the function calibration page for details).
Product Parameters
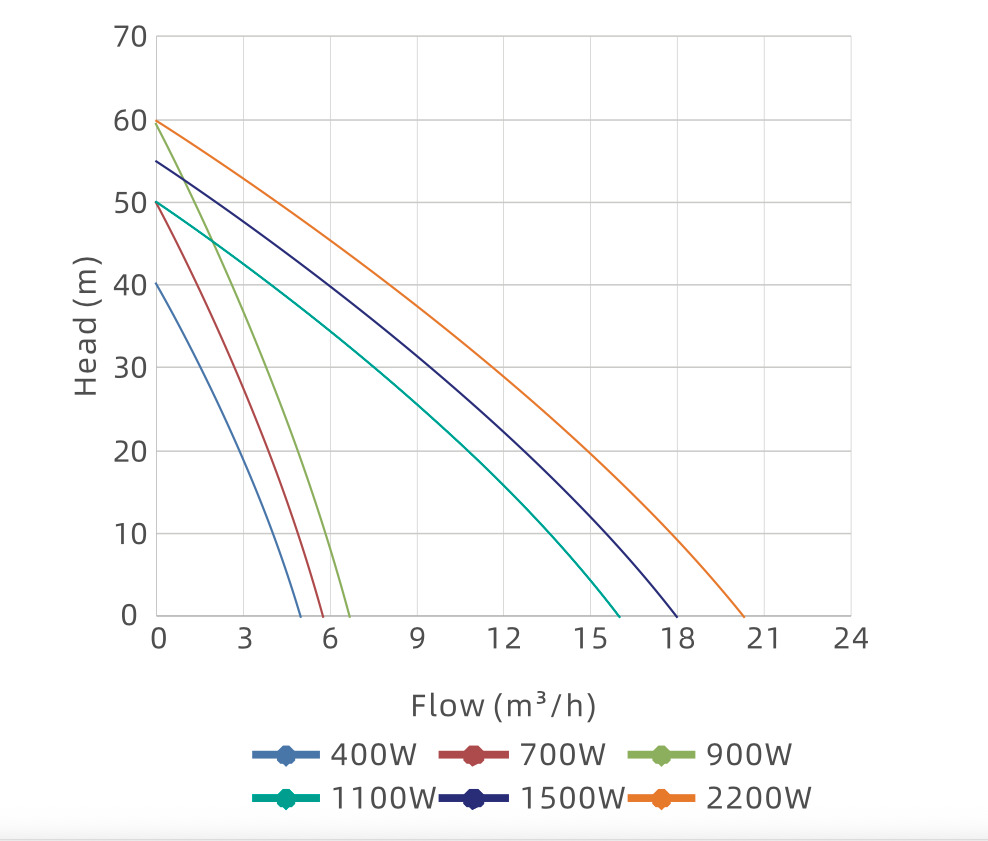
TECHNICAL DATA
| Model | Power (w) | Rated Flow (m³/h) | Rated Head (m) | Max Flow (m³/h) | Max Head (m) | Max Speed (r/min) | Inlet/Outlet (mm) |
|---|---|---|---|---|---|---|---|
| YC-B-400 | 400 | 2.5 | 22 | 4.8 | 40 | 4200 | 25 |
| YC-B-700 | 700 | 3.5 | 30 | 5.8 | 50 | 4600 | 25 |
| YC-B-900 | 900 | 4 | 30 | 6.5 | 60 | 4300 | 25 |
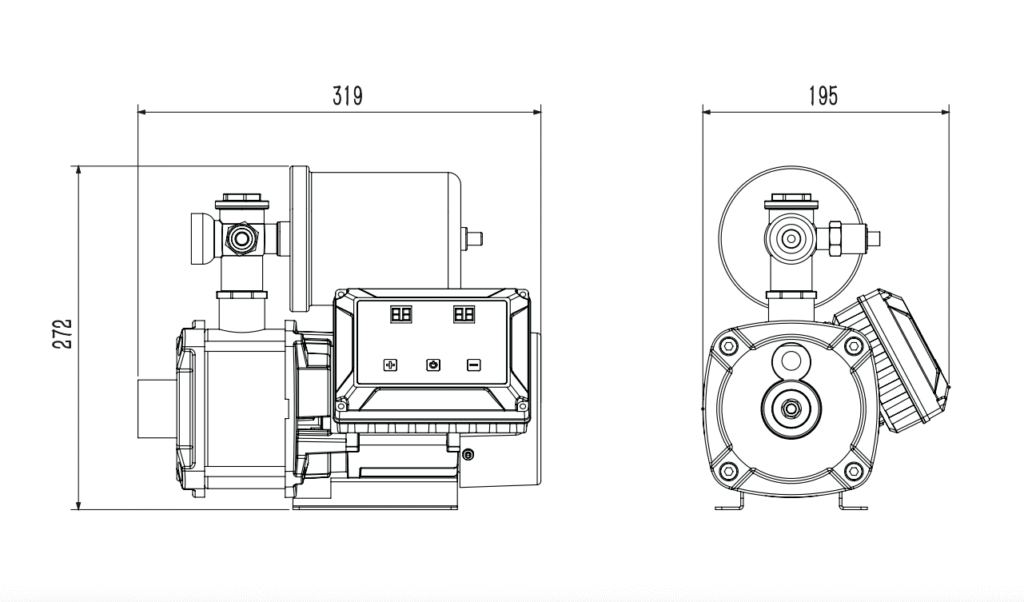
Dimensions
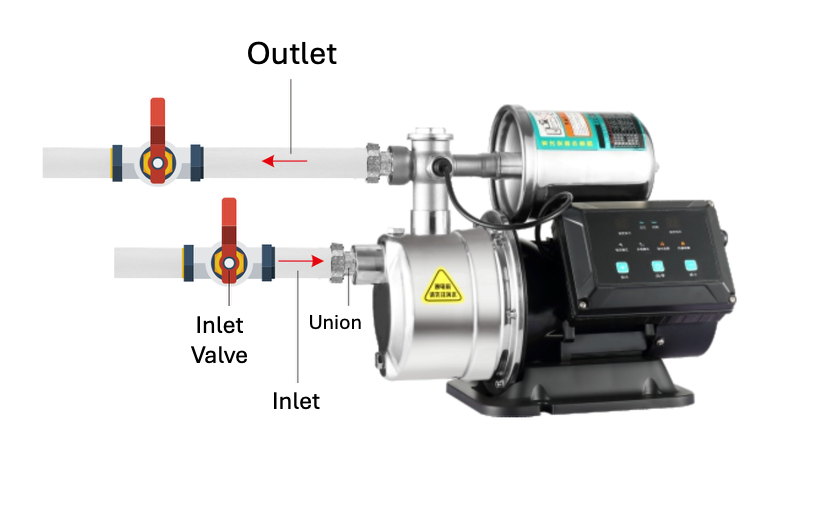
Installation and Operation Instructions
- Strictly prohibit running the pump without water.
When operating, the pump body must be filled with water before powering on. - The pump must be kept in a horizontal position!
When connecting to a water source, ensure the inlet position and water flow direction are correct. - After installation, ensure all pipelines are completely sealed and check for leaks at joints, valves, etc.
After stopping water use, close the valve tightly to prevent back pressure and avoid failure to stop. - Unscrew the water-filling plug and fill the pump chamber with clean water.
- Clean the filter screen regularly according to the cleanliness of the water source (recommended inspection once every 1–3 months).

- The booster pump itself contains no parts that users can repair on their own. All maintenance must be carried out by personnel with relevant technical qualifications.
- The manufacturer and distributor reserve all rights to this booster pump manual, including but not limited to copyright, the right of interpretation, and the right to further modification. Any changes to this manual may be made without prior notice.
- A leakage protection device must be installed during installation, and proper grounding must be ensured.
Mode Description
Constant Pressure Mode
This is the factory default mode. No setup or adjustment is required; it works upon power-on. If the water pressure is insufficient, you can adjust it manually by pressing the “+” or “–” button.
Water Tower Mode
When refilling a water tower, you can switch to the “Water Tower Refill Mode” to enable the delayed start function. The initial delay time is 0.5 hours (30 minutes). Press the “+” button to increase the delay in 0.5-hour increments, up to a maximum of 48 hours. To reduce the delay, press the “–” button.
Emergency Start Mode
In emergencies, this mode can be activated to manually adjust the motor speed. The default target speed is 1000 rpm (displayed as “10” on the digital screen). Press “+” to increase the speed in 100 rpm increments, or “–” to decrease it. In this mode, sensor alarms, water shortage alarms, and temperature alarms are ignored. It is not recommended for long-term use under normal conditions.
Function Description
Water Shortage Protection
If no water enters the pump or the water pressure remains below 0.5 (default) for 3 minutes (default), a “Water Shortage” fault will occur and the indicator light will flash. When water flow resumes or the pressure rises above 0.5, press the “Reset/Fault Clear” or “Start/Stop” button to restore normal operation.
High Water Temperature Protection
If the outlet water temperature stays above 70°C (default) for 3 minutes, a high-temperature alarm will be triggered. The “Water Shortage” light will flash, and the display will show fault code E12. When the temperature drops below 65°C (5°C lower than the threshold), the pump automatically resumes normal operation.
Anti-Freeze Protection
When the internal temperature of the pump falls below 3°C and the motor is not running, the system activates anti-freeze protection. The motor will operate at a fixed speed for 15 minutes to prevent freezing. If water usage occurs during this time, the anti-freeze protection will automatically deactivate. During this operation, the “Water Shortage” light will flash.
Setting Page Description
| Setting Prefix | Setting Description |
|---|---|
| C1 | Pressure calibration setting. Minimum value: 0, maximum value: 2.0, default initial value: 1.0. Calibrates the currently displayed pressure value. |
| C2 | Low water level alarm valve setting. Minimum value: 0, maximum value: 1.0, default initial value: 0.5. When the water level remains low for longer than the set duration (defined by the “low water level duration setting”), a low water alarm is triggered and a fault is reported. |
| C3 | Low water duration setting. Minimum value: 1, maximum value: 5, default initial value: 3. Unit: minutes. |
| C4 | Startup pressure ratio setting. Minimum value: 50, maximum value: 90, default initial value: 70. When the actual water pressure is lower than the set ratio (pressure × startup pressure ratio), the pump starts automatically. |
| C5 | High water temperature alarm switch. 0 = off, 1 = on. |
| C6 | High water temperature alarm valve setting. Minimum value: 25, maximum value: 80, default initial value: 70. When the water temperature exceeds this threshold, a high temperature alarm is triggered. |
| C7 | Low water temperature alarm switch. 0 = off, 1 = on. |
| C8 | Adjustable set pressure upper limit. Maximum value: 8.0. |
| C9 | Automatic stop detection switch. Prevents minor pressure fluctuations from causing the pump to start and stop repeatedly. Default: 1 = on, 0 = off. |
| CA | Pressure difference correction. A smaller value makes the pressure display more accurate but may also cause the pump to start and stop frequently due to minor pressure changes. Default: 10, minimum: 5, maximum: 20. |
| F1–F4 | Electrical parameters, not adjustable by the user. |
Fault Troubleshooting Guide
| Fault Code | Meaning | Solution |
|---|---|---|
| E01 | Low voltage | Please check the controller input voltage |
| E02 | Overvoltage | Please check the controller input voltage |
| E03 | Sensor failure | Please check the connection between the controller and the sensor |
| E04 | Module overtemperature | Please check the controller cooling |
| E05 | Software overcurrent | Please contact after-sales service |
| E06 | Hardware overcurrent | Please contact after-sales service |
| E07 | Current sampling bias error | Please contact after-sales service |
| E08 | Startup failure | Please contact after-sales service |
| E09 | Phase loss fault | Please check the motor connection wires |
| E10 | Stall fault | Please check whether the impeller is blocked or jammed |
| E11 | Communication fault 01 | Please check the connection between the main board and the interface board |
| E12 | High water temperature alarm | Please wait for the water temperature to drop or increase the alarm threshold |
| E22 | Communication fault 02 | Please check the connection between the main board and the interface board |
| E21 | Communication fault 03 | Please check the connection between the main board and the interface board |
Leave a Reply